 |
| My Core-Rig! |
 |
| Bits and Bobs! |
Taking the initiative of attaching the shaft beneath my office chair, I set about pulling an old bicycle maintenance stand, apart. The clamp would attach, I could then use my appalling welding skills to attach additional bits. The parts I used, were:
 |
| An assortment of parts... |
- Upper section, and clamp, from a maintenance stand
- The top-pole and plating from a crafter's side-table
- The swing-bracket-plate from a satellite dish
Tools:
- Small arc-welder
- Matt-Black Spray-Paint
- Allen-Key
- Clamps
 |
| Fixed on and ready to weld... |
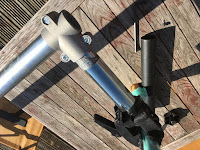
To begin with, I placed the top sections together and clamped it to a parasol-pole, this worked great. I then welded the satellite bracket to the left-end of the horizontal pole. and added the upright table-post. (This is where my welding really shows its poor grace!)
 |
| Swing-Bracket... |
Bringing it together, I drilled the new holes to offset the plate and sprayed it all up. It looks fine now, and at this point, I am ready to attach the flight-stick and throttle to it. I will post the look of this asap, and show it working on a vlog-post.
Check-out Part Two, to see how I have changed it, further, and get a better shot of the end-result.
Be happy, get building!
Gavyn, @beingSTEM


No comments:
Post a Comment